Showing posts with label Valentines. Show all posts

Thursday, February 7, 2013

Love Is In The Air

and it's time for an Oldie But Goodie from Bugaboo Stamps.  I'm featuring the oh so cute  Cupcake Ava image and she's perfect for this colorful Valentine card.  Now, she did come with a candle and some skulls, but I thought for a V-Day card, I would leave those out.  It was super easy, all I had to do was fussy cut the image.


I've entered this card in the following challenges:

2 Sisters-Color Challenge (white & red or pink)
Creative Inspiration-Anything Goes
Digi Stamps 4 Joy-Romance Is In The Air
Incy Wincy-Love Is In The Air
Paper Pretties-Valentines
Simon Says-Have A Heart
Sweet Stampin-Love Is All Around
Cutie Pie Challenge Blog-Valentine Cards

Until next time, have a great day and thanks for stopping by!  TTFN

Stamping Hugs,
Becky
Pin It

Saturday, February 11, 2012

Let My Love Rain Down

This is my second post today.  For today's Catch The Bug Challenge scroll down.

I've been busy making Valentine's card and I picked up this really cute Tiddly Inks image a couple of weeks ago.  She's so adorable and I love the hearts falling like rain.   I finally got the chance to color her and here she is.  This card is for the current Valentine challenge at Tiddly Inks


She's Catch My Heart and I colored her using Copic markers.  I created the sentiment using Word.  The Designer papers are Doodle Hearts Red from the paper studio and With Love Sweetheart from Pebbles.

Until next time, have a great day and thanks for stopping by!  

Stamping Hugs,
Becky

Pin It

Monday, February 6, 2012

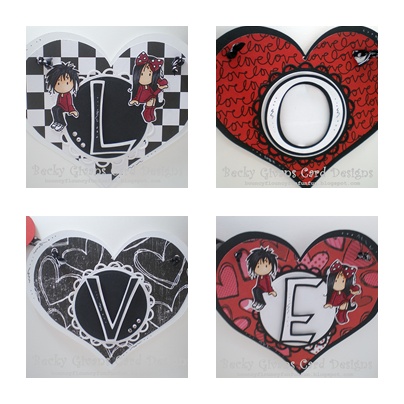
It's a "Banner" of a day.

It's also time for another ABC (anything but a card) at Catch The Bug. 

I've created a fun Valentine Banner using this adorable Ava & Deacon images from Bugaboo Stamps.  It's Ava & Deacon Heart.  


Here's a closer look at the L and E:


I printed the images on white card stock and colored them using Copic markers.  I cut them out and used only Ava and Deacon and not the heart they were sitting on.  I wanted them to appear to be sitting on the circles.  The hearts were all created using my Cricut and George cart.  The letters were also created using the same cart.  For the circles I pulled out my lacey circles and circles spellbinders dies and my cuttlebug.  The papers I used are doodle hearts in varying colors from the paper studio.

Other challenge I've entered this:

Creative Inspirations-Inspired By Love
The Paper Shelter-Love Is In The Air
Sweet Stampin Challenge-The One I Love
One Stitch At A Time-With Love
Digi Doodle Shops Best-Love Is In The Air
Crafty Boots-Valentines

I hope you enjoyed my banner and get the chance to make on of your own.

Until next time, have a great day and thanks for stopping by!  TTFN

Stamping Hugs,
Becky
Pin It

Sunday, January 29, 2012

Stella Says Sketch 103

I'm here with our Stella Says Sketch challenge at Catch The Bug.  Stella Says Sketch or SSS  is relatively new.  They started at the beginning of January and they are every other Sunday.
The rules are simple: Create a  Project that is Inspired by the below photo and post a link to it on Bugaboo Stamps' challenge blog, Catch the Bug,  by 2/11/12  at  6:00 AM EST to be entered a random drawing for three digi prize packs - seven (7) (using a Bugaboo image only), four (4), or two (2) using any image!  New projects only no backlinking please!


Here's this weeks sketch:


And this is what I did with it using Bugaboo Stamps Ava & Deacon Love Word.


I printed the image on white card stock and colored it using  Copic markers.  The Designer papers are Red & White Doodle Hearts and Black & White Doodle Hearts from the paper studio.  The border was made using my Cricut and Elegant Edges cart & the hearts were cut using my George cart.  I also used my Label One Spellbinder die.  A little doodling, ribbon and some Glossy Accents on the hearts and I was done.

Other challenges I've entered this card:


Until next time, have a great day and thanks for stopping by!  TTFN

Stamping Hugs,
Becky


Pin It

Saturday, January 28, 2012

Challenge Time-Catch The Bug

Are you ready to be inspired by color?!!  I sure hope so cause this weeks challenge at Catch The Bug is all about color!  Check out this yummy color palette!


Perfect colors for a Valentine card using Bugaboo Stamps new Deacon Cupid image!


I printed the image on white card stock and colored it using Copic markers.  I used a Valerie Salmon card sketch I had found on pinterest as my template.  The sentiment was printed using Print Shop.


So now that you've seen what I've done, let's see what you can do with this challenge, and when you're done, be sure to add a link to the Catch The Bug site.  You could win some fabulous Bugaboo images.  

Until next time, have a great day and thanks for stopping by!  TTFN

Stamping Hugs
Becky
Pin It

Monday, January 16, 2012

Day Three, Doing An ABC

Morning all!  Are you ready for  today's Bugaboo Birthday challenge?!!   Since we're celebrating turning two, your projects today should have two of something.  Two of anything,  you decide, be it papers, embellishments, images, whatever.  You decide!  Sound like fun?!!

It's my turn at Catch The Bug to make an ABC (anything but a card) project so I made a chocolaty floral arrangement with a gift tag attached using Bugaboo Stamps Heart Fairy.  I used two different colored wrappers on the chocolates, two ribbon colors and two designer papers although that one may be harder to spot.  Her dress is paper pieced.


To create the tag I printed the image on white card stock and designer paper.  I colored the image using Copic markers and then fussy cut just the dress  from the DP and added it to the colored image.  I added sentiment to the heart using my photo editing software.  The tag was cut using my Cricut and George cart.  A little glitter around the heart and the tag was done.

The chocolate arrangement was made by inserting  floral wire (16 GA) into Dove chocolates and attaching three leaf shaped pieces of tissue paper  to each stem with floral tape, just below the chocolate.  To add a little filler to it I twirled just the tops of a white pipe cleaner around a pencil.  The heart ribbons were made by twisting a pipe cleaner around  a bow and pulling it up into the shape of a heart.  You can't see it in the picture but I filled the vase with sparkly pom poms to give the stems some stability and make it pretty at the same time.

Other challenges I've entered this project:


Until next time, have a great day and thanks for stopping by!  TTFN

Stamping Hugs,
Becky

Pin It

Tuesday, January 10, 2012

It's The Simple Things

In life that make you smile and this weeks New Release at Bugaboo Stamps will have you grinning from ear to ear!  They're Simple Sticks and are they ever cute!  Let me take you back to your childhood with a Valentine gift bag and the oh so adorable Simple Stick Girl.


I  printed the image on white card stock and colored it using copic markers.  I used one of the cylinder shape in the George cart, stretched it to 9 x 6, added the heart shape (turning it) and cut it out.  I then cut the cylinder in the center so I had a back and front.  To make it into a bag all I had to do was take a strip of card stock 11 x 3 inches and score in 1/2 inch on each side to create glue tabs and also score it at  3 1/2 inches from each end.  The top strips are 3 1/2 x 1 1/4 inches.  Other items I used were ribbon, yarn, a Martha Stewart border punch and a white gel pen.

Other challenges I've entered this project:
I gotta scoot so I'll just say thanks for visiting!

Until next time, have a great day!!!  TTFN

Stampin Hugs,
Becky
Pin It

Saturday, January 7, 2012

Loving You Is A Treat

It's challenge time at Catch The Bug and this one's your favorite kind!  It's an ANYTHING GOES challenge!!!  You decide what you want to do with it!  You can use any  image you want and make anything you want but remember, if you want the chance to win seven Bugaboo Stamp images of your choice, you'll want to use a Bugaboo image.  Don't have any Bugaboo images?  No problem!  Jodie gives a free image every week!  All you have to do is click the link above and you can pick up the current image!  It's a cutie!!!

There are still prizes to be won if you don't use a Bugaboo image, third prize is two images and second prize is four images, so what're you waiting for?!!  When you finish your project, be sure to upload a link to it at Catch The Bug!

I chose to do a Valentines gift bag using Bugaboo Stamps Giraffe Heart 2!  Isn't he the cutest thing ever?!!!


I printed him on white card stock and colored him using copic markers.  I also pulled out some of my Martha Stewart's Enchanted Forest Borders.


Other challenges I've entered this card:


Until next time, have a great day and thanks for stopping by!  TTFN

Stamping Hugs,
Becky


Pin It

Tuesday, February 15, 2011

Hambo Hoedown challenge #2

Whew! It's been one whirlwind of a week and I just barely finished this card. Nothing like working against the clock! This is for the challenge on Hambo Hoedown. If you participate week after week, you get a new free image mailed to you. Isn't this little guy the cutest.  I love all the eyes!
I colored this little cutie with copic markers Y21, R35, R59, YG63, G99
The papers are Recollections black, red, GP white and AC Celebration dp.
The banner is from Shannon's Sentiments Shout Out set.
Extras: ribbon, buttons, cording


I pulled this card together in ten minutes and that included coloring the image. 

I'm off to bed now!  Y'all have a wonderful day and thanks for stopping by!  Until next time.  TTFN

Hugs, Becky

Sunday, February 13, 2011

Cooking With Cricut Sweet Shop Blog Hop Up, up and away with our second day

Welcome to Bouncyflouncyfunfunfun and the CookingWithCricut Sweetshop Blog Hop! If you’ve never enjoyed a blog hop before, it’s where you ‘hop’ between blogs following a chain of links, with each blog in the chain posting something exciting for the event! There will even be some great blog candy (giveaways) to win along the way! More on that in a moment!


If you've come from visiting Anita, you're in the right place! If you've just happened across my blog and would like to play along with our fun hop, you can go to CookingWithCricut.com and start at the beginning. Go HERE .


With Valentine’s Day just a few days away we are sharing some wonderful ideas and inspiration for your viewing and crafting pleasure! Each Design Team member will be featuring an original project each day (Saturday & Sunday) made especially for this hop. Make sure to check out each DT member's blog and collect the special letter there. There will be prizes along the way at our DT members' blogs, AND there will be some nice PRIZES with a few different ways to win at CookingWithCricut.com!

For today's project I thought it would be cute and kind of fun to make a Hot Air Balloon Box.  It's perfect for those yummy chocolatey treats.  I also included this adorable card.


Details on the card: 
I used Mini Monogram cartridges for the scalloped square and rounded squares.  I embossed the red panel using my hearts folder and cuttlebug.  Those adorable images are Love Bandits and they're from PageKits.com.  I colored them using copic markers.  The banner was created using Shout Out from Shannon's Sentiments and the sentiment circle is from Stampin Up's Love Ya set.  To add some texture I used white liquid applique and the heat gun on the raccoons hair.  Their noses and the key were made shiny by using glossy accents.  The papers I used were black and red card stock from Recollections, and white card stock.

Details on the Hot Air Balloon Box:
I cut out hearts each of black, red and white card stock using my George cart.  The black hearts are 5.  Red hearts are 4 1/2 with the shadow setting and the white hearts are 4 1/2.  I scored each of the hearts down the center and folded them and glued them together in layers.  I then glued each layer of hearts back to back making a circle stopping before I had glued the last hearts together.  It was time to make my box.  The box is 3 7/8 inches squared.  Before gluing the box together I made an insert to fit into the bottom by cutting a piece of card stock 3 7/8 inches by 5 7/8 inches.  I folded this piece in half and then added a score line inch on either side so when it was folded it had a peak.  I punched a hole in the center to thread my cording through.  I attached this piece to the inside bottom of the box.  I then pulled the cording through the center of the unfinished "balloon" and glued the last of the hearts together.  This  wasn't enough to stabilize the basket so I punched holes in each corner of the basket and two of the balloons on the side and ran cording through them and made my adjustments until the basket hung level.  To accomplish this I used two holed buttons on each of the corners.  All I had to do was sinch it like you would do a belt.  All that was left to do now was decorate and fill with candy.  This one's filled with my favorite chocolate, Lindors.  Yum, yum!

I hope my directions were clear enough but if they weren't I'd be happy to answer any questions you might have.

Here is a close up:


In addition to the chance to win prizes from Cooking With Cricut, Melin  at Pagekits.com has so sweetly offered this wonderful prize for me to give to one of my lucky viewers.  All you need to do is leave me a comment by Sunday, 12:00 PM CST and you could win this fabulous cut file or digi image, it's your choice.

Remember, this prize is seperate from the other prize package being offered.  To be eligible for that you need to collect your letters along the way.

Here is the “secret” letter you need to collect to be eligible for a prize package at CookingWithCricut.com. My secret letter is N.


Now it's your turn! Let’s see your sweet Valentine projects. Be sure to include a Cricut or other die cut machine cut on your project and link it up at CookingWithCricut.com. The Design Team will pick their three favorites and one lucky sweetheart will be chosen randomly to win one of the six prize packages being offered in this hop.


Next stop... Cathie!  Go see what she has in store for you today.


And don’t forget, when you're done, make sure to head back to CookingWithCricut.com and get entered to win one of SIX prize packages! Here’s how:


1. Link your sweet Valentine project and be one of the top three chosen by our Chefs.
2. Link your project and be the randomly drawn winner.
3. Collect all the letters and unscramble our “secret” phrase correctly and leave it in the special comment section on CookingWithCricut.com.
4. Or just leave a comment at CookingWithCricut.com and let us know how you liked our Sweetshop Blog Hop.


Here is our Hop line-up:
1. CWC-Melin
2. Abby
3. Anita
4. Me
5. Cathie
6. Christel
7. Dalis 
8. Deb
9. Erika
10. Gaby
11. Jean
12. Jenna
13. Jennifer
14. Jenny
15. Karla
16. Madison
17. Maria Elena
18. Melissa
19. Michelle
20. Nicole
21. Raven
22. Roberta
23. Ronnie

Until next time, have a great day and thanks for stopping by!  TTFN

Hugs, Becky
Pin It

Saturday, February 12, 2011

Cooking With Cricut Sweet Shop Blog Hop....Let's make Key Chains

Welcome to Bouncyflouncyfunfunfun and the CookingWithCricut Sweetshop Blog Hop! If you’ve never enjoyed a blog hop before, it’s where you ‘hop’ between blogs following a chain of links, with each blog in the chain posting something exciting for the event! There will even be some great blog candy (giveaways) to win along the way! More on that in a moment!


If you've come from visiting Anita, you're in the right place! If you've just happened across my blog and would like to play along with our fun hop, you can go to CookingWithCricut.com and start at the beginning. Go HERE .


With Valentine’s Day just a few days away we are sharing some wonderful ideas and inspiration for your viewing and crafting pleasure! Each Design Team member will be featuring an original project each day (Saturday & Sunday) made especially for this hop. Make sure to check out each DT member's blog and collect the special letter there. There will be prizes along the way at our DT members' blogs, AND there will be some nice PRIZES with a few different ways to win at CookingWithCricut.com!


I made these key chains using my George cart and Shrink plastic.  After a  little experimentation, I decided the best cut size was 3 1/2 inches.  You'll need the blade that cuts through chip board for this project. 

Key chain number one I free handed the art on it using copic markers and a black sharpie.

For key chains two and three I used the following:

After cutting out the heart, I cut a 3 inch heart from scratch paper and placed it on top of the shrink plastic, centering it.  I then colored around the exposed edge with a copic marker.  (It's best to use lighter colors as the color will intensify when it shrinks)  I used a black sharpie marker to trace the outside of my heart template and I free handed the lines.  I also used my George cart on a 1 inch setting to cut out the word "love".  After rmoving the heart template I then used the letter cut outs to trace the word "love" on the heart. 

Once I had punched a hole in the top using my standard everyday hole punch, it was time to get the heat gun out and heat the plastic.  I just followed the instructions on the shrink plastic packaging.

All there was left to do now was to add the key chain and I was finished. 

In addition to the chance to win prizes from Cooking With Cricut, Melin  at Pagekits.com has so sweetly offered this wonderful prize for me to give to one of my lucky viewers.  All you need to do is leave me a comment by Sunday, 12:00 PM CST and you could win this fabulous cut file or digi image, it's your choice.

Remember, this prize is seperate from the other prize package being offered.  To be eligible for that you need to collect your letters along the way.

Here is the “secret” letter you need to collect to be eligible for a prize package at CookingWithCricut.com. My secret letter is N.


Now it's your turn! Let’s see your sweet Valentine projects. Be sure to include a Cricut or other die cut machine cut on your project and link it up at CookingWithCricut.com. The Design Team will pick their three favorites and one lucky sweetheart will be chosen randomly to win one of the six prize packages being offered in this hop.


Next stop... Cathie!  Go see what she has in store for you today.


And don’t forget, when you're done, make sure to head back to CookingWithCricut.com and get entered to win one of SIX prize packages! Here’s how:


1. Link your sweet Valentine project and be one of the top three chosen by our Chefs.
2. Link your project and be the randomly drawn winner.
3. Collect all the letters and unscramble our “secret” phrase correctly and leave it in the special comment section on CookingWithCricut.com.
4. Or just leave a comment at CookingWithCricut.com and let us know how you liked our Sweetshop Blog Hop.


Here is our Hop line-up:
1. CWC-Melin
2. Abby
3. Anita
4. Me
5. Cathie
6. Christel
7. Dalis 
8. Deb
9. Erika
10. Gaby
11. Jean
12. Jenna
13. Jennifer
14. Jenny
15. Karla
16. Madison
17. Maria Elena
18. Melissa
19. Michelle
20. Nicole
21. Raven
22. Roberta
23. Ronnie

Until next time, have a great day and thanks for stopping by!  TTFN

Hugs, Becky

Tuesday, February 8, 2011

X's and O's


Hello my blogging crafty friends!  Happy Tuesday!  I have a Valentines card for you today.  I combined two blog challenges for it but didn't get it posted in time for one of them.  I came home from work last night with a raging headache and took some tylenol and went straight to bed. 

The two challenges I am speaking about are Tiddly Inks "Kiss Me You Fool" challenge to use a kiss on your card.  I used X's and O'x for the kiss.  That cute image is a freebie from them.  I colored the roses with copic markers and the bear with prismacolor pencils.  I then colored the flowers and nose with glossy accents.

The other challenge I made this for is Jen's Sketch For You To Try.  I won't miss the deadline on this one because it's a monthly layout challenge.

I pulled out some kraft and chocolate chip card stock and Anna Griffin American Craft DP that I picked up at Michaels for this one.  I did a little sponging around the edges with Cranberry and added a row of scallops and ribbon and called it done.

I gotta get back to work now so until next time, have a great day and thanks for stopping by! 

Hugs, Becky

Wednesday, February 2, 2011

Cooking With Cricut challenge #15

Good morning and welcome to this weeks Cooking With Cricut challenge. The theme this week is Groundhogs Day so we will be using shadows on our projects. Now according to Puxatwnee Phil, who did not see his shadow this morning, we're in for an early spring. I sure do hope so. I'm ready for the cold weather to end and for spring to arrive. It's fourteen degrees here in Dallas, Texas. Yes, you heard me right. Fourteen degrees and that doesn't even include the wind chill!!!!! BRRRRRR!!!!!! I'm sitting here all bundled up while I type this post but enough about that. Here is my card for the challenge.


I used the Mouse Couple Kissing Topper from Page Kits and watercolored the image. I decided to let it perch on top of the scalloped box which contains the shadowing on my project. I added four shadowed hearts made by layering the red heart on top of the black heart, slightly off setting them. They were cut using my George cart and so were the letters. I also used my Mini Mono cart for the scalloped box. Since I was using the Mouse Couple Kissing Topper I chose to make Valentine card.

Be sure to check out all the other fabulous projects from the team and we would love for you to play along.

Thanks and have a great day! Stay warm! TTFN

Hugs, Becky

Tuesday, January 25, 2011

Think Loving Thoughts

Good morning my crafty friends! Hope you're all having a great day!

I posted a card on SCS yesterday and one of the persons who left a comment suggested I check out a new blog challenge. The blog is Sugar Creek Hollow and the challenge was to make a card that is mostly black and white with just a splash of color.

So, just before I went to bed last night I had the idea for a quick Valentines card. It's quick because most of it was already done for me.

I've had this Best Occasions mixed media pack sitting on my shelf for a while and from time to time I would pull it out and use one or two sheets of the designer paper from it, but mostly ignored the punch outs it had in it. Silly me!

Well, while flipping through the pages for dp last night, I had one of those light bulb moments to spell out the word LOVE and the rest came together so easy. All I had to do to punch it up was to add this cute fairy image from Bugaboo Stamps that I colored with copic markers and prismacolor pencils. I love all the gray and black tones with just a pop of red, don't you?

I love it when a plan comes together! LOL

Hope you enjoyed today's project. I'm headed back to work for now but hope to be back later. Y'all have a great day and thanks for stopping by! TTFN

Hugs, Becky
Pin It

Saturday, January 22, 2011

Peek a boo, thinking of you

Hi there! Hope you're having a great weekend! I didn't think I was gonna create today cause I'm still feeling a little bit of the yuck but when I saw the challenge on Catch The Bug, I thought, hmmm I can do that!

This weeks challenge is to make a white or mostly white card and as you can see I opted for the mostly white. I love cards with a lot of white space, don't you? They just look so clean and bright.

This cute little bunny is one of the fun images in this month's 20 for 20 and isn't he adorable? I love how he's peeking around the heart.

I printed him twice and colored him with copic markers and a little bit of watercoloring. I then cut out the heart and hands and popped them up.

A while back I picked up a box of embossed cards from DCWV and the one with hearts was just perfect for today's project. The flowers along the top were cut with my cricut and george cart. I just added some ribbon, buttons and a bow and I was done.

Super quick and simple. Just what I needed today.

Thanks for stopping by and have a great day! TTFN

Hugs, Becky
Pin It

Wednesday, January 19, 2011

Longing For Love


I made this for today's mini challenge on Catch The Bug. It's a sketch challenge so pretty much anything goes as long as you follow the sketch.

Isn't that giraffe the cutest? He's one of the images you get in this months twenty for twenty.


I colored his hearts with copics and watercolored the rest of him.

The hearts and slider and oval for the sentiment were all made using my cricut and George cart.

I'm not gonna go on anymore since I just looked at the clock and I have to scoot.

Have a great day and thanks again for stopping by. TTFN

Hugs, Becky

Monday, January 10, 2011

It's a banner day for love

I made another dinosaur valentine card yesterday but by the time I finished it, my dd was working on homework so she needed the computer. so I didn't get it posted. I have only a few short minutes to get it posted now, but I'll do my best.

This card is for this weeks challenge on Catch The Bug. The challenge was to emboss so I pulled out my Love Language folder and embossed the white panels.

I loved the dinosaur image colored in red so much that this week I decided to throw two of them in here. I used my photo editing software to flip the image so they could be facing each other, holding a heart.

The banner was made using my Cricut and George cart and just adding lettering to them. I just love how this turned out.

Wow! I guess my time is up so I need to hit "post".

Y[all have a great day and thanks for stopping by!

Hugs, Becky

Sunday, January 9, 2011

Valentine Love Bug

Wow! I'm on a roll this weekend. Three cards so far and I'm pretty sure I'll be stamping more later today. It's gonna be too cold and too wet to do anything outside the house so I might as well stamp, right?!!! The weatherman is even saying we are in for some snow!!!

I made another card with the Lollipop Buggy-Butterfly image from By LORi Designs. I just can't seem to get enough of the little cutie petutie. Isn't she adorable in her Valentines Day colors?!!

Claudia & Company has a challenge on her blog to use tags on your card so I pulled out my Stampin Up tag punch for this one. I stamped the word LOVE on it and heat embossed it and added some ribbon to finish it off.

This card is also for this week's sketch challenge on Paper Craft Planet.

I printed the image on white card stock and colored it with copics and prismacolor pencils.

This is a pretty simple layout, just lots of layers.

Have a fabulous day and thanks for stopping by! TTFN

Hugs, Becky
Pin It

Friday, January 7, 2011

Valentine Tree


I had the idea for this card rolling around in my head for two days now but since I've been back at work this week, I haven't had the time to be creative til tonight. It turned out just as I pictured it in my head. So nice when that happens.
For this card I used my Cricut and Graphically Speaking cart for the tree and sentiment, George cart for the heart, and Mini Monogram cart for the scalloped square. I also blew the dust off of one of my all time favorite Stampin Up background stamps, By Definition(retired) and got it inky.
Those cute little hearts were a find at Target and they're from Colorbok.
I thought I was finished with it then and there but it just needed something more. I did some tracing around the outside of the tree and letters with my black fine tipped marker to make them pop. It really made a big difference in the final outcome of this card.
The back panel is embossed using my hearts embossing folder and cuttlebug.
I'm gonna call it a night. Now that I've got this card out of my head and onto paper, I'm gonna go see what my little mind can dream up for tomorrows card making. Have a great day and thanks for stopping in to see me. TTFN
Hugs, Becky

Saturday, January 1, 2011

Wow! Two cards in one day! This has to be some kind of record for me. It's easy peasy when the layout is done for you and the image has already been colored.


I printed off a bunch of digital images yesterday and spent most of the day coloring them for later projects.

I made this card for Jen's sketch challenge posted here.

I used my new Lollipop Ella image from By LORi designs and colored her using both Copics and Prismacolor Pencils. I paired her with one of my favorite Stampin Up sets for this time of year. Celebrate U (retired).

The background panel was cut using my Cricut and Storybook cart.

I made the ribbon flower and it's the same color as the ribbon but for some reason (prabably lighting) it looks a lot darker in the picture, but rest assured, it is the same color.

Have a wonderful rest of your weekend and thanks again for stopping by! TTFN

Hugs, Becky
Pin It

LinkWithin

Related Posts with Thumbnails